
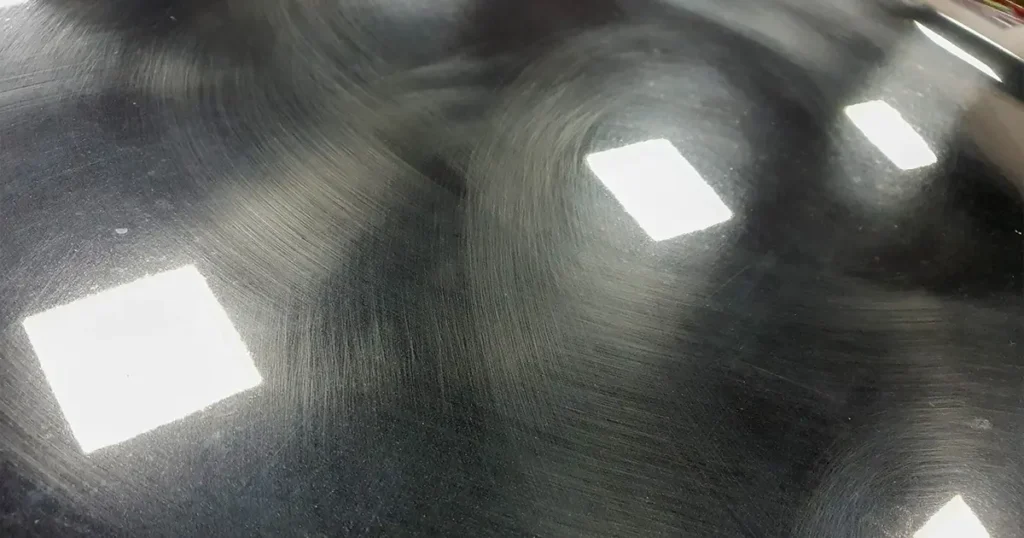

You have likely seen them before: you’ve just finished washing your car, the sun hits the hood, and suddenly you see a series of web-like, circular scratches dancing across the surface. These are known as swirl marks. While your car might be “clean” in terms of having no mud or dust, these tiny grooves in your paint make the finish look dull, hazy, and aged. Beginners often find this frustrating because no matter how many times they wash the car, the “webs” remain.
The reason they appear most visible in direct sunlight or under a bright LED lamp is due to how light reflects. Each tiny scratch has two “shoulders” or edges; when the sun hits these edges, the light scatters in multiple directions, creating the illusion of a circular pattern. In reality, these are just thousands of microscopic, multidirectional scratches. Understanding that swirl marks car paint is a common issue is the first step toward achieving a professional-grade, mirror-like finish.
What Causes Swirl Marks?
Swirl marks are not a defect of the paint itself but are almost always “user-inflicted” during the cleaning process. They occur when abrasive particles—like fine sand, road grit, or dried mud—come into contact with your paint under pressure.
- Automatic Car Washes: This is the most common culprit. The heavy, rotating brushes in “tunnel” washes are rarely cleaned between vehicles. They slap the grit from the previous ten dirty trucks directly onto your clear coat at high speeds.
- Incorrect Washing Technique: Using a single bucket and an old sponge is a recipe for disaster. A sponge traps dirt on its flat surface and grinds it into the paint as you move. Furthermore, many beginners make the mistake of using circular motions while scrubbing; this is exactly how those circular patterns are born.
- Dry Wiping: Wiping dust off a dry car with a rag is essentially like using sandpaper. Without lubrication (like a quick detailer or soap), the friction causes the dust to cut into the clear coat.
Swirl Marks vs. Deep Scratches – What’s the Difference?
To understand the difference, you need to know how your car’s paint is structured. Think of it as a “sandwich” of layers: the metal panel, a primer (base coat), the actual color paint, and finally, the clear coat. The clear coat is a transparent, UV-resistant lacquer meant to protect the color underneath.
Swirl marks are very shallow “grooves” that exist only in the very top of that clear coat. Because they are shallow, they can be removed by “leveling” or thinning the clear coat slightly until it is smooth again.
Deep scratches, on the other hand, are a different story. If a scratch has penetrated through the clear coat and reached the color or the metal, it is considered permanent damage in the context of detailing. A good rule of thumb is the “fingernail test”: if your nail catches in the scratch, it’s likely too deep to be polished out. In these cases, you risk “burning through” the clear coat if you try to buff it away, which creates a permanent dull patch.
Can You Remove Swirl Marks by Hand?
The short answer is: yes, but it is incredibly difficult and often ineffective for a whole vehicle. How to remove swirl marks involves the science of abrasion. You are essentially using a chemical (polishing compound) that contains tiny “rocks” to grind down the clear coat until it is level with the bottom of the scratches.
Doing this by hand requires an immense amount of physical pressure and time. Most “hand polishes” sold in retail stores contain fillers or waxes. These products don’t actually remove the scratch; they just fill it in temporarily so the light doesn’t reflect off the edges. After a few washes, the fillers wash away, and the swirls reappear. To truly remove them, you need the consistent speed and friction that only a machine can provide.
How to Remove Swirl Marks with a Machine Polisher
For paint correction for beginners, the tool of choice is the Dual Action (DA) polisher. Unlike a rotary machine, which spins on a single axis and can easily burn the paint if you aren’t careful, a DA polisher moves in two directions (spinning and orbiting). This generates much less heat and is significantly safer for a first-timer.
The process, known as one-step paint correction, involves these basic steps:
- Decontamination: You must wash the car and use a clay bar first. If you leave one piece of grit on the paint, the polisher will pick it up and create “spiral” scratches.
- Mapping: Divide your panel into small sections, roughly 70×70 cm.
- The Combination: You apply 4 to 6 pea-sized beads of a medium-cut compound onto a foam polishing pad.
- The Pass: You move the machine in linear, overlapping lines (left-to-right, then up-to-down) using moderate pressure. After 4 to 7 passes, the clear coat is leveled, and the high gloss returns.
How to Prevent Swirl Marks in the Future
Once you have removed the swirls, the goal is to never have to do it again. Prevention is much easier than correction.
- The Two-Bucket System: Use one bucket for your soap and a second bucket with clean water for rinsing your mitt. This ensures you never put a dirty mitt back onto your paint.
- Grit Guards: Place these plastic filters at the bottom of your buckets to trap dirt at the base, so it doesn’t float back up into your wash water.
- Linear Motions Only: Always wash and dry in straight lines. If a piece of grit does cause a tiny scratch, a straight line is much less visible to the eye than a circular swirl.
- The 8-Side Rule: Fold your microfiber towels into quarters, giving you eight clean sides to work with. Flip the towel frequently to ensure you are extracting dirt rather than smearing it.
- Contactless Drying: If possible, use a leaf blower or a dedicated air dryer to remove water without touching the paint at all. If using a towel, choose a high-quality “twist-loop” microfiber and gently pat or pull it across the surface.
Conclusion
Swirl marks are the most common “eyesore” in the automotive world, but they are also entirely preventable with the right system. By moving away from circular scrubbing and adopting a professional top-to-bottom, linear workflow, you can keep your clear coat looking brand new for years. Remember that every time you polish, you are removing a microscopic layer of your car’s “skin,” so prioritize safe washing to avoid the need for frequent correction.
If you are ready to stop guessing and start achieving professional results, join us for our Car Polishing Course on Udemy. We will walk you through everything from reading paint thickness to mastering the DA polisher, giving you the confidence to restore any vehicle to its former glory. Follow for more detailing secrets!